
What is a better snack than a cheeseburger? A double cheeseburger of course!
Yes, I love cheeseburgers, and this quick and easy snack is just the job for those fast food cravings for the ultimate "ready meal".
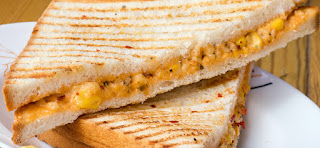
Cheeseburger Toastie Pockets

A good cheeseburger must have the right balance of meat to cheese and to bread, as well as a touch of sauce. Of course, a luxurious burger may have a nicely toasted or even a brioche type bun, but these tosty pockets with their buttered golden grilled crusts at least provide a similar container for your favourite meat and cheese combo.
What you will need for the perfect Cheeseburger Toastie Pockets
As always, my preference is for thick sliced bread for my toastie or grilled sandwich everytime. Thick sliced bread is a must as, in my opinion, the bread is the most important part of any sandwich. White sliced, or a 50/50 white/wholemeal combination always works well. For these toastie pockets I have chosen a thick sliced 50/50 to provide the perfect balance in terms of depth and flavour.

For the "beef" part of my burger I use one of my favourite minced beef choices. Whether for a Bolognaise sauce or chilli con carne I always turn to a pack of frozen lean minced beef (from my favourite frozen food supplier). Quite simply this is in a bagged, dry crumbled format so that you can defrost and use a small amount and reseal and keep the rest for another time. This is great for these type of recipes when you may require just enough for one person and you don't have to cook the whole tray.
Also, who hasn't cooked a tray of fresh or defrosted mince and spent ages breaking up the long strands of packaged mince as you cook, whereas the frozen mince that I buy cooks in a dry pan in a matter of minutes and requires no breaking up.

The cheese I have chosen for these toastie pockets is a mature grated cheddar. I prefer my cheese to have a good depth of flavour, but you could opt for any type of cheddar or whatever is in your fridge. As I am always "unready" and also, I hate grating, I find it much easier to buy the cheese ready grated from my local supermarket. I always have a few bags of different kinds of cheeses in my fridge so I'm always ready for that craving for sandwich or snack. These are usually supplied in resealable bags so you can just use the amount you want and keep the rest for later (up to 5 days so no need for waste).

For the sauce element for my cheeseburger you could of course use any of a number of ready made shop bought "burger" sauces, but I choose to simply recreate those sauces by using a little tomato ketchup and mustard, which you can add to or alter depending on your own personal taste.


Making the perfect Cheeseburger Toastie Pockets

These toastie pockets require a little preparation prior to assembling. As previously mentioned you can see that the frozen mince comes in easily manageable form, similar to dry pellets, so you can simply measure the exact quantity that you require (in this case sufficient for two people). For this recipe I find that 100g per person (which is a little under equivalent to a quarter pounder) is perfect, and this frozen lean 5% fat beef steak mince has only 118 kcal (per 100g).


Once the beef mince is weighed and ready, take a non-stick frying pan and heat up the dry pan over a medium heat.


Once the mince is cooked (be careful not to overcook), set aside and turn on your sandwich maker. While the appliance is heating up gather all the ingredients together and butter one side of each of the slices of bread. These will be the sides that come into contact with the hotplates, and help to achieve the beautiful golden outer surfaces of the bread during the cooking process. (You could lightly spray or spread on a good quality oil if you prefer).
At this stage I prefer to turn over the slices and form a recess with the back of a spoon in line with the recesses of the sandwich maker, but this is not a necessity, simply a personal preference to "house" the mince pockets.


Now sprinkle the mature grated cheese on top of the beef mince, keeping in place in the triangular form if possible.

On the underside (non-buttered side) of the top slices spread a teaspoon full of mustard and add to this a teaspoon of tomato ketchup to replicate your favourite "burger" sauce flavours.


Place the top slice on top to complete the sandwich with the buttered side uppermost, then with your sandwich now assembled, once the appliance is up to temperature, carefully place the completed sandwich onto the bottom grill plate (taking great care as this is very hot and will sizzle noticeably upon contact).
Now close the top plate slowly, being careful not to move the assembled sandwich, then lock the handle.
Cook for approximately 5 minutes or until golden.

Once your cheeseburger toastie pockets are ready, switch off the appliance at the socket. NEVER lift your finished sandwich out with your fingers as the plates will still be extremely hot! Always use wood or plastic tools to loosen and lift away your sandwich, which usually comes away from the non-stick surface easily. Allow to cool slightly for a minute before cutting and serving.
The Recipe

Cheeseburger Toastie Pockets
EQUIPMENT
- 3-in-1 snack maker with sealed toastie plates
PREPARATION TIME : 10 minutes
COOKING TIME : 5 minutes (approx.)
SERVINGS : 2
INGREDIENTS
- 4 slices of thick 50/50 white/wholemeal bread
- 16g butter or similar
- 200g of cooked lean 5% fat beef steak mince
- 40g mature grated cheddar cheese
- tsp mild mustard
- tsp tomato ketchup

STEP BY STEP INSTRUCTIONS
- Cook the beef mince in a frying pan until browned and set aside
- Turn on the snack maker
- While the appliance is heating up gather the remaining ingredients together
- Butter one side of each of the 4 slices of bread
- Turn two slices over (buttered side down) and form recesses in the same shape as the plates
- Fill the recesses with equal amounts of the pre-cooked beef mince, compressing into shape gently
- Cover evenly with the grated mature cheddar cheese
- Spread the mustard and ketchup onto the dry side of the top slices
- Put the top slice of bread in place with the buttered side uppermost
- Carefully place the completed sandwich onto the grill plates
- Close the top plate gently onto the sandwich and close handles and lock
- Cook for approximately 5 minutes or until golden
Or you could try...
 Why not place a small slice of pickled gherkin in each pocket before covering with the top slice to give that authentic burger experience.
Perfect with...

The Cheeseburger Toastie Pocket is perfect on it's own as a snack at any time of the day, or whenever the fancy takes you.
Or simply add some microwave chips (and some tomato ketchup of course), to create a quick and tasty "happy" meal.
How does your sandwich maker compare?
For most of the recipes shared here I use my trusty Tower Deep Fill 3-in-1 Sandwich Maker, so obviously you may need to adjust your ingredients slightly if you are using a different appliance. Having said that, most sandwich makers are very similar in design and size, and the amount of each filling is a guide only and you can increase or decrease, add or subtract, according to your personal taste.
Never be afraid to experiment, and remember you won't always get the perfect result first time, so if at first you don't succeed try, try and try again. It's great fun!
If you want to check out some of the alternative 3-in-1 machines available check out our guide...


Comments
Post a Comment